

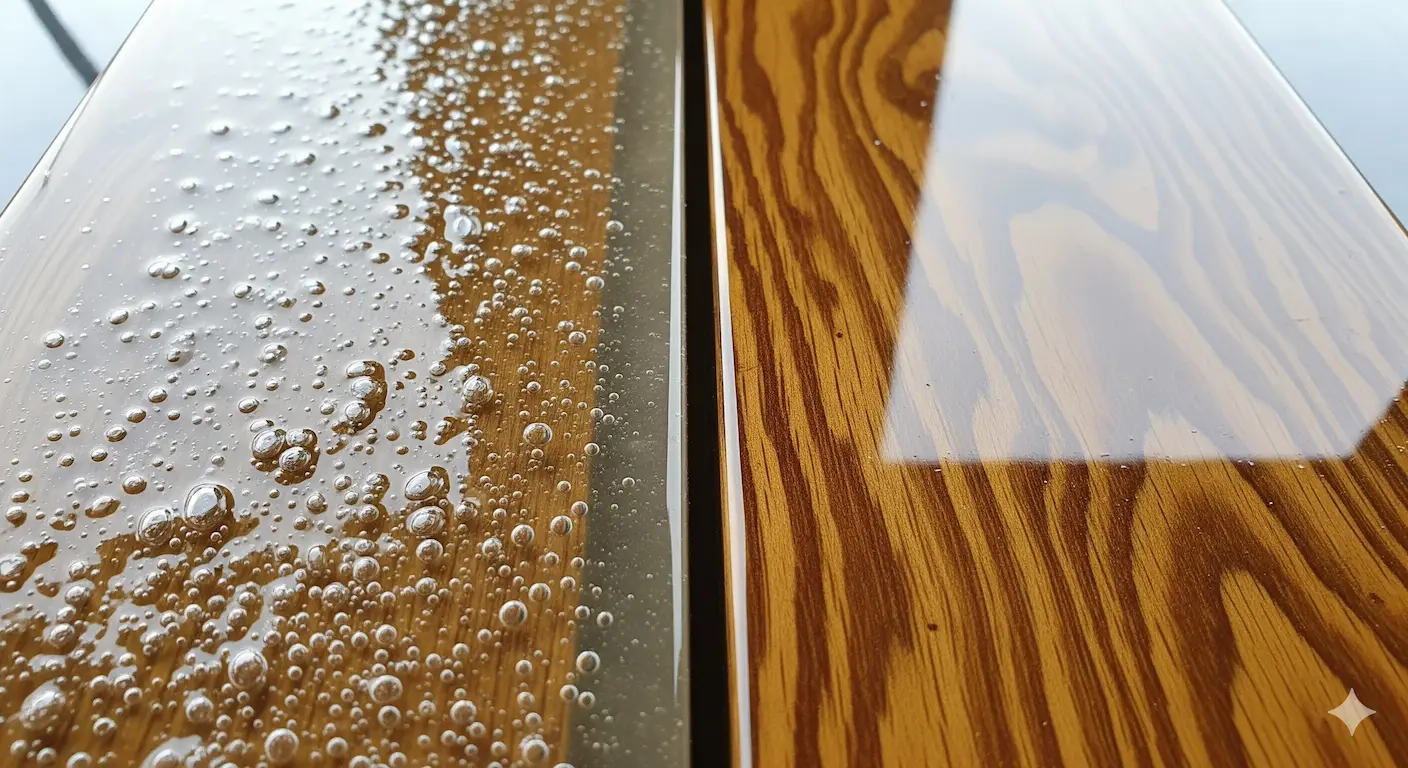
If you’ve ever watched a perfect epoxy pour get ruined by tiny bubbles, you’ve experienced the frustrating result of skipping a proper epoxy seal coat for wood. This single, foundational step is the secret to a flawless finish, yet it remains the most misunderstood process in the world of resin art. You find that perfect slab with magnificent grain, spend hours preparing it, only to see your crystal-clear vision turn into a carbonated mess. It doesn’t have to be this way. If this scenario feels painfully familiar, let me assure you: you are not alone, and it is not your fault.
The Science of the Seal Coat: Your Ultimate Guide to a Bubble-Free Epoxy Finish on Wood
Table of Contents
I’m Hamed Shahsavandi, founder of EpoxyRescue. For years, I’ve guided artisans and creators through these exact moments of frustration. I’ve detailed many of these solutions in my book, [Money Making Wood Pieces], but the single most misunderstood—and most critical—process in achieving a perfect finish is the seal coat. Many people think it’s an optional step. I’m here to tell you it’s the entire foundation.
This isn’t just another “how-to” guide. This is a deep dive into the why. We’re going to explore the science of wood porosity and solve a problem that stems directly from improper preparation—one of the [5 Critical Epoxy Resin Mistakes That Waste Time & Money] we cover in our foundational guide. We will give you a step-by-step masterclass on applying a perfect epoxy seal coat for wood. By the end of this guide, you won’t just be applying a seal coat; you’ll understand it so deeply that bubbles will no longer be a source of fear, but a problem you solved long before you even started your main pour.
Why Bubbles Are Inevitable (Without a Seal Coat): The Science of “Outgassing”
Before we can defeat the enemy, we must understand it. The bubbles that plague your epoxy projects don’t come from your mixing technique (usually); they come from the wood itself.
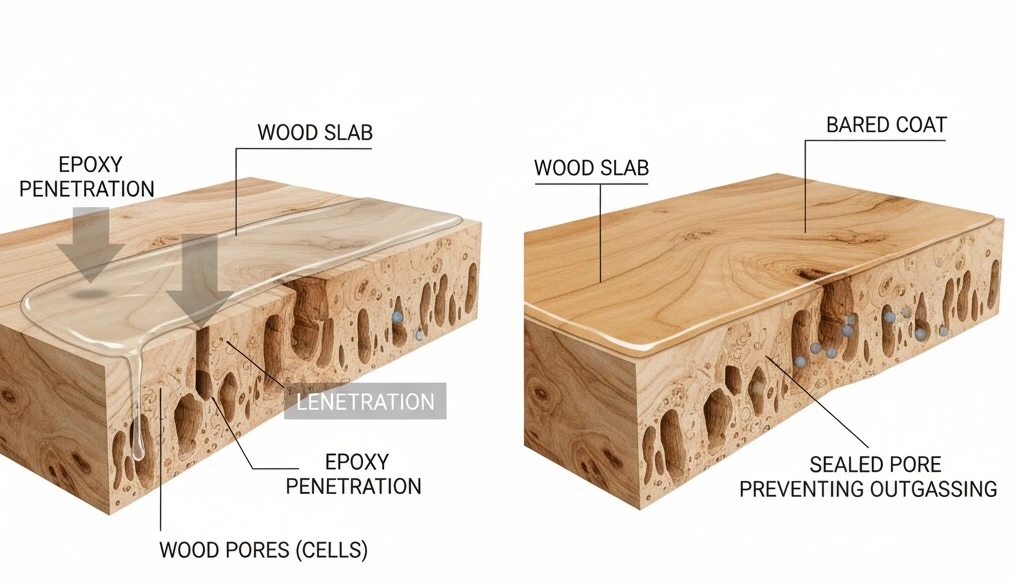
Wood is not a solid, inert material. Think of it as a massive bundle of microscopic straws. These “straws” are the pores and vessels that once transported water and nutrients when the tree was alive. Now, they are filled with air and moisture.
When you pour your main layer of epoxy (the “flood coat”) over unsealed wood, a critical event happens: the epoxy begins its curing process. This is an exothermic reaction, meaning it generates heat. As the epoxy warms up, it heats the air trapped inside the wood’s pores. Basic physics tells us that when air gets warmer, it expands and tries to escape.
Where does it escape? Directly up, through your liquid epoxy. This process is called outgassing.
The result is a relentless, continuous stream of tiny air bubbles rising into your epoxy layer. You can hit them with a torch a hundred times, but as long as the wood is still releasing air, more bubbles will appear. This is why an epoxy seal coat for wood is not a suggestion; it’s a scientific necessity. It’s the only way to permanently block those escape routes.
What Exactly Is an Epoxy Seal Coat? (And What It Isn’t)
A common misconception is that a seal coat is just a thin, brushed-on first layer of your regular epoxy. While partially true, its purpose is far more specific.
An epoxy seal coat for wood is a specially applied, thin layer of epoxy designed to penetrate and block the pores of a porous material like wood. Its primary functions are:
- To Create an Impenetrable Barrier: It sinks into the wood grain and cures, creating an airtight shield. When you later apply your hot flood coat, the expanding air is trapped below this shield and cannot escape into your main pour.
- To Stabilize the Wood: For softer woods or live edges with delicate bark, a seal coat can add structural integrity, hardening the wood fibers and preventing them from breaking off into your project.
- To Prevent Color Bleeding: A seal coat can stop tannins and natural oils in the wood from leaching into your epoxy, which can cause discoloration.
It is not a flood coat. Its goal is not to build thickness or create a glossy surface. Its only job is to create a perfect, non-porous foundation for the main event. Properly sealing wood before resin application is the difference between an amateur and a professional finish.
The Step-by-Step Master’s Guide to a Perfect Epoxy Seal Coat
Now, let’s move from theory to practice. Follow these steps meticulously, and you will eliminate 99% of your bubble-related problems.
Step 1: Flawless Surface Preparation
You cannot seal a dirty or unprepared surface. This step is non-negotiable.
- Sanding: Sand your wood to its final grit (typically 180-220 grit). A smoother surface allows the seal coat to spread evenly.
- Cleaning: This is critical. Use a vacuum with a brush attachment to remove all dust from the pores. Follow up with compressed air to blow out any remaining fine particles. Finally, wipe the surface with a tack cloth or a lint-free cloth dampened with 99% isopropyl alcohol. Let it evaporate completely. Your surface should be surgically clean.
Step 2: Mixing the Epoxy for Your Seal Coat
- Use the Right Resin: You can use the same epoxy you plan to use for your flood coat. However, a slightly thinner viscosity resin is often ideal for a seal coat as it penetrates better.
- Mix a Small, Accurate Batch: You need far less epoxy than you think. For a medium-sized table, you might only need 3-4 ounces (90-120 ml) in total. Mix it according to the manufacturer’s ratio (e.g., 2:1 or 1:1) with extreme precision.
- Mix Thoroughly: Mix for the full recommended time (usually 3-5 minutes), scraping the sides and bottom of the container. Under-mixed epoxy will never cure properly, and a sticky seal coat is a disaster.
Step 3: The Art of Application
Your goal here is a thin, penetrating layer, not a thick, glossy one.
- Choose Your Tool: A plastic or Bondo spreader is often the best tool. It allows you to apply pressure and really work the epoxy into the wood grain. A high-quality brush can also be used, but be mindful of leaving brush strokes or loose bristles.
- Apply and Spread: Pour a small amount of the mixed epoxy onto the wood surface. Using your spreader at a 45-degree angle, firmly pull the epoxy across the entire surface. You are essentially “squeegeeing” the resin into the wood, not just spreading it on top.
- Cover Everything: Pay special attention to knots, cracks, and end grains, as these areas are highly porous and will release the most air. Make sure your epoxy seal coat for wood covers every square millimeter that will come into contact with the flood coat.
Step 4: Patience is a Virtue (Curing Time)
This is where many people get impatient and ruin their projects. You cannot rush the cure.
- Check the TDS: Your epoxy’s Technical Data Sheet (TDS) is your bible. It will tell you the recommended “recoat time.” This is the window in which the seal coat is cured enough to be stable but still chemically receptive to the next layer for a perfect bond.
- The “Tacky” Test: Generally, an epoxy seal coat for wood needs to cure for 4 to 10 hours, depending on the brand, temperature, and humidity. The ideal state for recoating is when the surface is “tacky.” When you touch it with a gloved finger, it should feel sticky like the back of a piece of tape, but it should not transfer any liquid resin to your glove. If it’s still wet, wait longer.
Step 5: The Post-Cure Check & Recoat
- Inspect the Surface: After the initial cure, inspect the surface. You might notice that some areas (like knots) have absorbed all the resin and look dry again. This is normal. These highly porous areas may require a second seal coat.
- To Sand or Not to Sand: If you are applying your flood coat within the “recoat window” (usually under 24 hours), you typically do not need to sand the seal coat. The chemical bond will be strong. However, if you wait longer than the recommended window, the seal coat will fully cure and become glossy. You must then sand the entire surface with 180-220 grit sandpaper to create a mechanical tooth for the flood coat to adhere to. Failure to do so can lead to delamination later.

Troubleshooting Common Seal Coat Problems
Even with the best preparation, issues can arise. Here’s how to handle them.
- “I still got a few bubbles!” This can happen if the wood was extremely porous or the temperature in your workshop increased significantly during the flood coat cure. A second seal coat on problem areas often solves this. It’s a key reason why sealing wood before resin is so vital—it minimizes, if not eliminates, this issue.
- “My seal coat is uneven or has drips.” This means it was applied too thickly. If it’s still wet, try to spread it thinner. If it has cured, you’ll need to sand down the high spots and drips until the surface is level before proceeding.
- “My seal coat is still sticky after 24 hours.” This is a red flag. It almost always means your mixing ratio was incorrect or you didn’t mix it thoroughly. Unfortunately, you must remove all the sticky resin with a scraper and solvents like acetone or isopropyl alcohol before starting over. Pouring over a non-curing layer is a recipe for complete project failure.
Frequently Asked Questions (FAQ) about Epoxy Seal Coats
- 1. Can I use sanding sealer, polyurethane, or varnish instead of an epoxy seal coat for wood? While you technically can, it’s not recommended. Those products are not designed to create a 100% guaranteed chemical bond with the epoxy flood coat. Using the same epoxy for both the seal and flood coat ensures perfect compatibility and the strongest possible bond.
- 2. Do I need to seal coat both sides of the wood? For river tables or projects where both sides will be exposed, absolutely. Sealing both sides balances the moisture content and prevents the wood from warping or cupping over time.
- 3. How many seal coats do I need? For most hardwoods, one proper seal coat is sufficient. For very porous woods like spalted maple, rotten/punky wood, or burls, you may need two or even three thin coats to fully seal the pores.
- 4. Does temperature affect my seal coat? Dramatically. Colder temperatures will significantly extend the cure time, while warmer temperatures will accelerate it. Always work in a stable environment, ideally between 70-78°F (21-25°C).
Conclusion: The Seal Coat is Not a Step, It’s a Philosophy
We’ve covered the science, the step-by-step process, and the troubleshooting. By now, you should see that applying an epoxy seal coat for wood is more than just a task on a checklist. It’s the embodiment of a professional philosophy: preparation is everything.
It’s the quiet, unseen work that guarantees the success of the final, visible masterpiece. It’s the difference between fighting with your materials and working in harmony with them. At EpoxyRescue, our mission is to empower you with this foundational knowledge so you can move past common frustrations and unlock your true creative potential. You don’t have to fear bubbles anymore. You have a proven, scientific method to defeat them every single time.
Have you had a nightmare experience with bubbles? What was the one tip that changed everything for you? Share your story in the comments below—your experience could be the rescue another artisan needs!
Best Regards
Hamed Shahsavandi – CEO of EpoxyRescue Educational Group